ARCH 653 Building Information Modeling in Architecture_Project2_Final
Final Project - Accessing BIM Data for Creative Design and Applications
-Parametric BIM through API: develop your BIM API application using the techniques we have studied in the course.
1. Concept
Energy Saving Lighting by lighting fixture controlled by window parameter through API
2. Projects Ideas
Nowadays, energy saving lighting is one of the important factors to be considered when we design the building. Not only it is an instrument that makes environment bright functionally, but it also improves the energy efficiency. In this project, I would like to make a lighting fixture controlled by window parameter such as width and height of window. Also, I will apply aesthetic factors by changing lighting fixture color. These intensity and color of light will be changeable by area of the window and window application. It will decorate the house more colorfully and provide cost saving efficiency, which will provide this house more attraction with nice roofs.
3. Initial Model
I plan a lighting which attached wall and will generate different intensity and color according to the size of window and by selecting color at the window application.
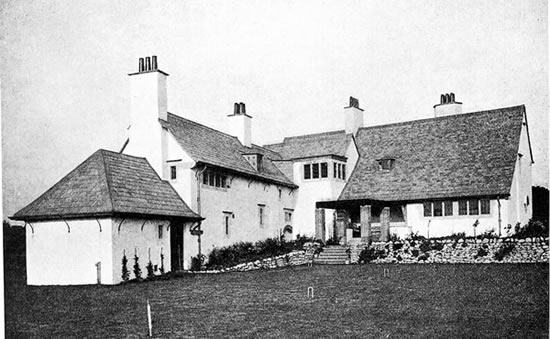
 |  |
Figure 1 Exterior Model | Figure 2 Interior Model |
4. C# Programming Code
Based on RoomTableChair_V1 as a template file, this programming codes use a type parameter of lighting which will be the one of the portion for lighting initial intensity and color filter. First, the form1 is used because I would like to input the width, height and color of the window. Because I control the type parameter, all of windows’ size in this room will be changed by the same. To apply the variable both form and command files, I assign the static variables in region 0. The detailed codes are like below.
 |
Figure 3 #region 0. & #region 1. |
In the region 0, I used some variables by public static double because it should have a reaction with command file and form1 file. Each of variables has a value such as ‘4’, because if they assigned with ‘null’ or ‘0’, it does not work well. By processing inputting exact value when the form 1 shows, the result value will be change correctly.
 |
Figure 4 #region 2. |
In the region 2, I used id to get the window and light family instance. I assigned each of them as a type parameter. I do not need to assign all of window family instance separately. By changing one of window’s size values, all of window’s size which is the same family will be changed.
 |
Figure 5 #region 3. |
In the region 3, I get type parameters of the objects from family instance. Also, window parameters are divided by ‘windowHeightTypeParam’ and ‘windowWidthTypeParam’ to control each of them. To get the light parameter, I used the ‘BuiltInParameter’ because light factors are grouped which make me control each of them separately.
 |
Figure 6 List of BuiltInParameter |
 |
Figure 7 #region 4. & #region 5. |
In the region 4, I get values of the parameters. Height and Width parameters are converted to double variables such as ‘windowHeight’ and ‘windowWidth’ to get specific values. Also, I converted imperial unit to metric unit because I used metric unit in the Revit and C# program get the value by imperial unit.
In the region 5, message box show the user some information about initial height and width of windows and initial intensity of light.
 |
Figure 8 #region 6. & #region 7. |
In the region 6, the values of height and width of wind will be input. Each of them will be converted to the imperial units.
In the region 7, I assigned ‘double lightIntensity’ to get the value of light intensity. Because if size of window (ftHeight * ftWidth) becomes larger, the daylight will be larger, I used inverse proportion and multiplied the proper values like 100000.
 |
Figure 9 #region 8. |
In the region 8, I set parameters of objects by using new values that the user input. Also, message box provide changed value of light intensity.
 |
Figure 10 Window Application |
Form1 shows that user choose the height and width of windows and color of light. If user clicks the OK button, the values will transfer to the command file. I used ‘if else’ for the selecting the color.
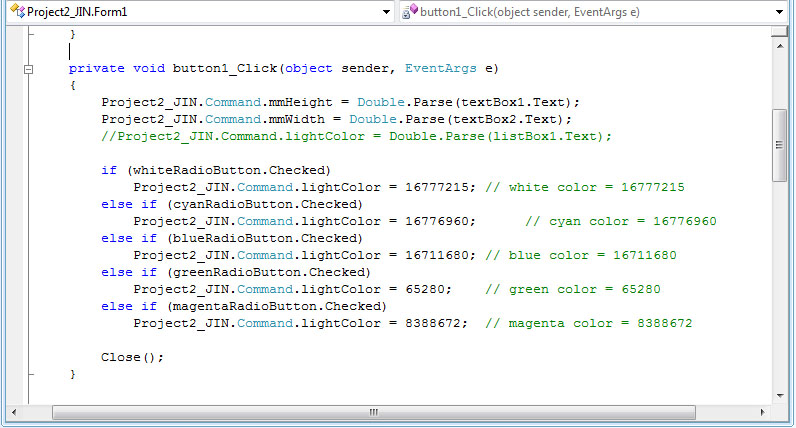 |
Figure 11 Button1_Click Codes |
5. Process of the operating
 |  |
Step1. Initial Height of window | Step2. Initial Width of window |
 |  |
Step3. Initial Intensity of Light | Step4. Input the values |
 | 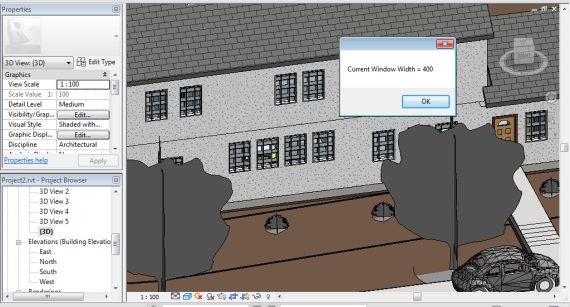 |
Step5. Current Height of Window | Step6. Current Width of Window |
 |  |
Step7. Current Intensity of Light | Step8. Changed Window Size |
 |  |
Step9. Changed Intensity of Light | Step10. Initial Window Size |
6. Results of Images
- Variation of the intensity of light according to the size of light
 |
| Figure 12 400X400_58000 |
 |
| Figure 13 400X800_29000 |
 |
| Figure 14 400x1200_19000 |
These images show how the intensity of light affects according to the size of windows. As the size of windows gets larger, the intensity of light gets smaller which can call ‘energy saving lighting’.
- Variation of the color of light according to selecting in Form1.
 |
| Figure 15 400_1200_19000_high_blue |
 |
| Figure 16 400_1200_19000_high_cyan |
 |
| Figure 17 400_1200_19000_high_green |
 |
| Figure 18 400_1200_19000_high_magenta |
These images show the variation of the lighting’s color. By changing the color of lighting, people who live in this house can enjoy nice atmosphere.